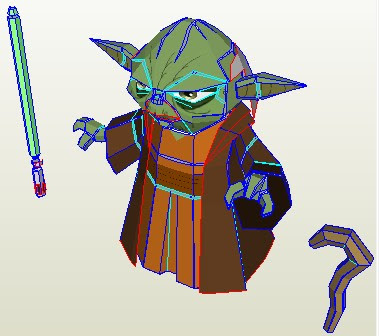
You’ll need Pepakura Viewer in order to open PDO files . see more about Pepakura Viewer
guard
PDO1 PDO2 PDO3 PDO4
PDF1 PDF2 PDF3 PDF4
see more
This is a little more complicated than a two-dimensional paper snowflake but it looks excellent and is a suitable craft for children adept with scissors and who have patience in making crafts. It will produce a 6-armed three-dimensional snowflake decoration that makes a perfect tree decoration or window-hanger.
1. Assemble the materials (see "Things You'll Need"). Paper, scissors, stapler, & tape

Paper, scissors, stapler, & tape
2. Fold each of the 6 pieces of paper in half, diagonally. If the paper you're using doesn't make a perfect square, cut off the edge that sticks out (rectangular edge) and make it align perfectly.
3. Cut 3 lines each side of the triangle from the folded edge (as per illustration), making sure not to cut through the unfolded paper edges. The cut lines should be parallel to one another each side and come close to meeting in the middle but not touch; leave a small space between them. To make this easier, you can fold the triangle in half. This way you'll cut both sides at once, making a very symmetrical snowflake. This might not be suitable for thicker paper, since the number of layers makes it difficult to cut through.
Parallel cuts
4. Unfold your paper and turn it so that the diamond shape is facing you for working with.
Unfolded paper
5. Still keeping your paper diamond side-up, roll the first two innermost paper lines together to form a tube. Tape these two pieces together. You should see triangle shapes on each side of the roll.
First roll
6. Turn the diamond over to the other side. Take the next two paper lines and pull them together on the opposite side of the tube and tape together as before. This will be a more rounded shape and wider than the first tube.
Next join
7. Keep turning the paper and joining the paper lines together on opposite side until all paper lines have been joined.
Once all lines are joined
8. Repeat this process (steps 3 - 7) with the remaining 5 pieces of paper.
9. Join 3 of the completed rolled pieces together at one end (draw together with your fingertips) and staple together using the other hand. Do the other 3 pieces the same way. Now you will have 2 pieces consisting of 3 strands or "arms" each.
Joining 3 rolled pieces together
10.Staple the two new pieces together in the middle. You will almost have the snowflake shape by now.
Joining the 2 pieces to form a snowflake
11. Staple where each of the 6 arms meet. This ensures that the snowflake shape is pulled into place. See illustration at top for the finished snowflake.
Staple where the arms meet
12. Decorate further if desired (see "Tips" for suggestions). This is optional but might be suitable if you are creating a Christmas scene or other decorative theme.
13. Choose one point to be at the top of your snowflake and attach a piece of metallic yarn or cotton for hanging. (This is best tied on the decoration, as a staple might not hold the thread well.) Pierce a tiny hole with a needle and thread through the metallic thread and tie with a small knot, twice. Do this very gently to avoid tearing the paper.
Select shiny threads from your thread collection
14. Hang your new decoration on the tree or in a window space. Make several snowflakes and hang them at different lengths against a window for an effective display. They appear especially beautiful against a backdrop of a dark night sky.
more here
The headline will read "Beautiful Centerpieces from $5 to $500," said the magazine's style editor to me, "and we want you to design the $5 model for our readers." Now designing expensive projects is easy; exquisite papers, elaborate designs, and a lot of time (all of which translates into a lot of money) are all you need to create something beautiful. Pulling off the same effect with only five bucks and a few simple steps is many times harder. The challenge was right up my alley.
Since the price point would be modest, I decided to try my hand at making some paper daisies, those most humble of field flowers. The materials list was extremely modest:
1. Paper (I used pieces from my paper scraps pile: textured and smooth pink and white-on-white, as well as long, narrow, strips for the flower centers)
2. Hot glue gun with glue sticks
3. A craft knife
4. A circle template (I used an upside-down drinking glass)
5. Floral wire and green floral tape for making the daisy stems
I loved the results so much I kept at it, coming up with a handful of options for the editor to choose from. In the end, the magazine decided to print a number of my designs in their story. Unfortunately, this one—one of my favorites—never made it into those pages but I thought I'd share it with you here. If the response to this is good, I'll feature, in an upcoming post, one of the designs that actually made it into print. They were really gorgeous so, please let me know if you want to see more of this sort of thing.
Perfect Paper Daisies
Begin with a circle of paper cut to the overall dimension you want your daisies to be. I used an inverted water glass with a 3-inch mouth as my cutting template. Cut two (2) circles for EACH bloom you intend to make.

A drinking glass provided the cutting template. Pick a size circle that best suits your purposes. Two-inch circles will make the flowers look more precious while five-inch circles will add impact. (Be sure your paper is stiff enough to maintain its shape if you opt for making the larger blossoms.)
Next, make eight (8) cuts as indicated in the illustration below. Each cut is about 1 inch long.

Since this project was intended to be both easy and low-cost, I tried to create something that could be done like an assembly line. This set of cuts can be done on 3–6 disks at once, making it a very fast project to complete.
Next, fold each petal in half, lengthwise, as indicated by the dashed lines in the illustration below. There is no need to pre-score these folds since the added time and effort do not significantly improve the results. Just a simple crease will suffice.

By modifying the manner in which you crease these pieces, you can achieve a great deal of variation in the final results. Try soft creases or partical creases at just the tips or even hand-shaping each petal to enhance the organic look of your own flowers.
Once you've finished creasing one disk, simply repeat these first three steps with all of your remaining disks. Blossoms are created by layering two (2) disks, one on top of the other, and affixing them with a dot of hot glue. Be sure to align them in such a way as to allow the petals on the bottom to peak through between the petals on the top.

The key to the success of these pieces is their great texture and dimension, which is achieved through simple folds and layering.
For the centers of each flower, I simply took a narrow strip of yellow or pink paper about 1/8 inch x 18 inches, and wound it into a tight spiral disk and glued it in place. I finished each flower by affixing it to a length of floral wire with hot glue, and then wrapping the stems with green floral.


A friend of mine made a simple request to me: "Show me something I can make in an hour that isn't going to cost and arm and a leg and won't leave me frustrated and discouraged by the time I finish it."
In one sentence, she summed up what every crafter I know is looking for. We want to make something and have fun doing it. Yes, sometimes, we'll go to extraordinary lengths, but mostly, we'd like it to be simple and straightforward. So today, I am going to focus on just that and nothing else. All you'll need to accomplish this is a strong shape, a simple armature, an interesting palette, and the means to put it all together. What could be easier (and more appropriate) during these hectic two months we refer to as "the holidays."
The supply list is modest:
When you're done with your first wreath, made a second or a third. They are great projects to do with children and they look wonderful hung in groups of three or five on the wall of a guestroom or above a sideboard in a dining room.

During the holidays, I do what I can to stay clear of the predictable use of red and green. Why not take a clue from nature and create a berry-colored wreath this year?

Working around the outer edge of my styrofoam wreath form, I simply hot-glued an assortment of colored paper disks in place.

Once you finish the outer edge, add a second course of disks to the inner edge, again, gluing them in place.

A third tier of colored disks is added so that it slightly overlaps the outer course below it.

A fourth and final course of disks is then added to completely cover the wreath form and hide it from view.

The addition of some 1/2-inch, tricolored "berries" (punched from red, fuchsia, and burgundy paper) along with a wide ribbon from which to hang it completes this project in no time.
Original design by Blogging Secret | Sponsored by System Monitoring | Ads Theme Blogger Template